Hello Everyone!
Before we get started I would like to thank all of you for your amazing comments and support for my first blog post! I did not expect such a wonderful response and you guys really made my day! (If you haven't seen my first blog post then feel free to check it out, its called 'Hello Blog World').
(Also sorry for taking so long for this second post, I didn't realise how busy I was going to be! I have so many ideas and the posts are going to be a lot more regular now. Haha!)
 |
| I'll be honest, I thought this ended up looking really arty so I had to put it in! |
(Also sorry for taking so long for this second post, I didn't realise how busy I was going to be! I have so many ideas and the posts are going to be a lot more regular now. Haha!)
Right! So lets get to it...
 |
| Here are some ideas of some basic mediums you could used to create you mark making. (At first I tried to keep my work area neat and tidy, but lets be honest, it got very messy very quickly). |
Mark Making Definition
Mark making is a term used to describe the different lines, patterns, and textures we create in an artwork. It applies to any art material(s) we use on any surface(s), not only paint on canvas or pencil on paper. A dot made with a pencil, a line created with a pen, a swirl painted with a brush, these are all types of mark making.
Personally, I believe mark making is created in pretty much anything we do. Creating these textures, lines, shapes and patterns not only adds to the composition, but also adds to the individuality of your art work; to know that the marks you have created are unique to you.
Mark making is also a fun way to become more experimental and maybe discover and practise new techniques that you could then develop into a final outcome.
 |
| I love using palette knives and rulers, it makes a change from the paint brush and can create very interesting marks and textures. |
Here are some ideas of techniques and mediums you could use to help practise with mark making and see what works for you:
- granite pencils on primed paper (gesso, Emulsion, etc.)
- ink and nib
- biro and water
- ink and bleach
- oil/acrylic paint and palette knives
- chalk and charcoal
- biro (used to created bold marks)
- wax
- printing with ink
- ink in water
- brush strokes
- continuous line drawing
These are just a few ideas, there are so many ways to make your mark. If you have any further ideas I would love to hear them and try them out! All creative inspiration is welcome here!
The rest of this post is showing some of my attempts at the mark making experiments listed above. Feel free to dip in and out and see what you like.
Salt and ink/watercolour
The rest of this post is showing some of my attempts at the mark making experiments listed above. Feel free to dip in and out and see what you like.
Salt and ink/watercolour
 |
| Here I washed water over paper and added splats of ink. As the ink dispersed in the water I sprinkled salt on top. This created a reaction as it dried. I then used my fingers to rub off the excess salt. |
 |
| Once the excess salt had been brushed off, a dramatic pattern was created. This could then be drawn on top of creating very interesting marks. |
 |
| I also used water colours with the same technique. |
Ink and Bleach


Above is one of my favourite techniques with mark making. It uses water based ink, pencil, bleach, and biro.
First, wash some water over your paper (you can experiment with different types of paper to give you slightly different outcomes). Then wash over ink on the wet page to ensure a better coverage. Make sure your ink is water based, other wise the bleach will not work.
You can buy water based ink; however, if your like me and you don't think you have any, then you can use ordinary felt-tip pens and then wash the water over the page. Leave this to dry.
 |
| Water added to ordinary felt-tip pens also works just as well if you don't have water based ink. |

You can try out different ways of applying the ink, dripping, brushing, etc.

Once the ink is dried, you can then draw anything you like onto the page, I recommend using a 2B or 3B pencil.
Now its time for the magic! This step involves bleach so please be careful! Put a small amount of normal household bleach into a jar and with a paint brush you can apply the bleach to any areas of your work that is light. Remember you only need a little bit of bleach at a time as little bleach goes a long way. Wash your hands after you finish using the bleach.
You can then finish up the drawing with a biro pen. I used black but you can use any colour you want.
I love this technique as I find it really helps improve your skills of noticing the light and dark in observational drawing.
 |
| I could then work into this further with a fine liner pen, maybe add different colours or add some texture with paint. This would create more depth. In doing this mark making experiment it helps you to further develop ideas for a final outcome. (It's also really fun!) |
Abstract Brush Strokes

Here I experimented with different shades and tones of the same colour of acrylic paint. The patterns I created were quite abstract but this helped me to loosen up my art work and to try to be more confident in my brush strokes.

Chalk and Charcoal

Here I created abstract marks with the light and shade of the chalk and charcoal.

Ink in water

This is super fun, quick and easy! All you need is a tray of water, different colour inks, a stick or comb to mix and swirl the ink, and cartridge paper (this is quite absorbent and will keep it's structure when dipped into the water).
I love doing this so much! Just fill a tray with water, drop in some inks, swirl the ink in the water with a stick or a comb. Then place your paper on top of the water for a few seconds. (Don't submerge the paper, let it lightly float on top of the water). When you take the paper away it will have a beautiful, intricate pattern on it. The ink will magically dry in less than a minute too!
I left mine as they were (and stuck them on my wall!) as I thought they were so beautiful, but you could further experiment and work into them with different techniques and mediums.

Biro and water
 |
| I added some red biro ink here to further experiment, and depth and texture to the mark making. |
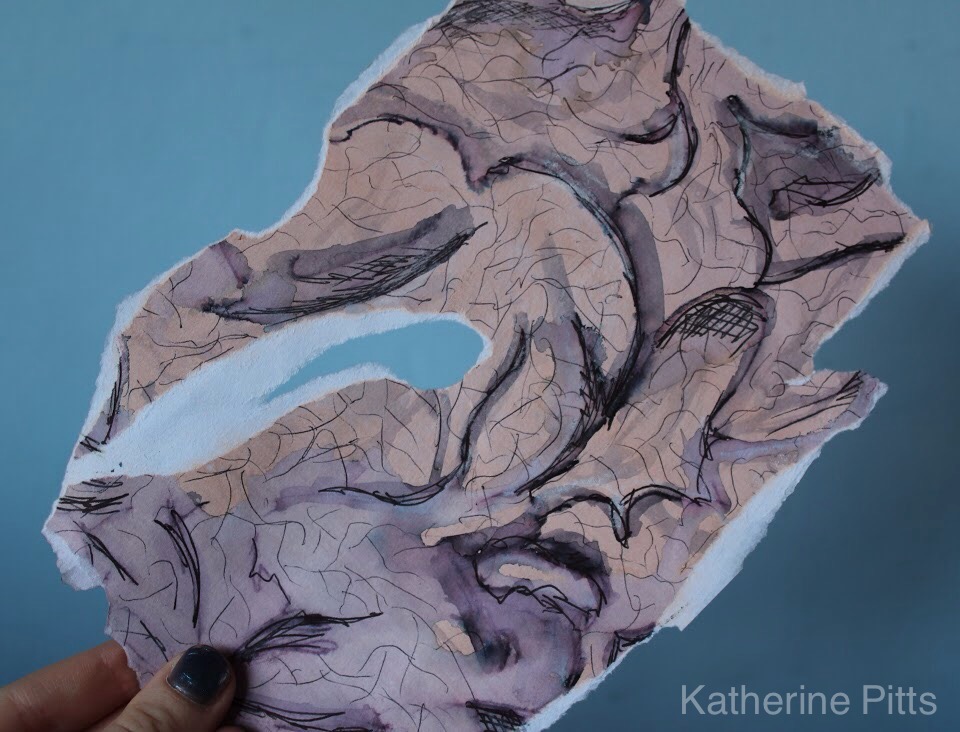 |
| I ripped into the paper here. Experimenting and taking risks like this really helps to loosen up your art work. Even if it goes wrong or doesn't end up how you wanted, this helps us to learn for the future! |
Palette Knives
 |
| Here I experimented by mixing the acrylic paint with the palette knife and applying it straight to the paper. This helps all the colours show as they are not fully mixed. Again this was a very abstract quick experiment that helps to then develop more ideas for a final outcome. |

I ripped random pages out of books, melted wax and dipped the pages into the wax. Please be careful when doing this, the wax will get incredibly hot. (I burnt myself when doing this so please be careful).
Once you have taken the page out of the Wax it will dry almost immediately. I then crumpled the page to add interesting marks.
I drew some of my abstract, mark making, experimental drawings from these wax pages.

So there you go! I know this post was long, so you're the best for getting to the end! Feel free to dip in and out and read what you want.
If you have any other ideas or questions, please let me know in the comments. I will be delighted to hear from you.
Hope you enjoyed this and it has inspired you to get creative!
Thanks for reading have a great day!
Excellent! Packed full of fresh ideas and clever art tips. Liked all the health and safety advice too. Nice one. Keep the blogs coming!
ReplyDeleteHaha! Thank you so much! I'm glad you enjoyed it!
DeleteI love using palette knives with acrylic paint! This makes me miss art school!
ReplyDeleteGreat post, I love your creativity :)
www.lindseyginge.com
Thank you! Your comment means so much to me! I'm glad you liked the post
DeleteAnd your blog is awesome! I love the DIY planner idea, I'm definitely going to do that!
Delete